
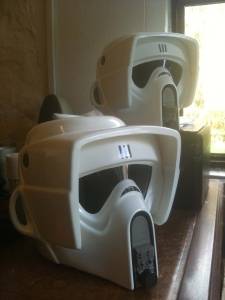
Building a Scout Helmet
Tools used in this tutorial
1x Helmet Kit
Lexan Scissors or Aviation snips
Stanley Knife
Sandpaper (various grades)
Sanding Blocks
ABS Glue
Hot Glue Gun
Clamps (various sizes)
Heat Gun
Body Filler (Bondo to those in the US)
Undercoat Paint
White Top Coat Paint
Masking Tape
Step 1
Now, these helmets are quite an involved build and should test any builder because of the multiple skills involved, but the key is patience….. Check, check and check again.
This process applies to ALL of the Scout based buckets, regular, Storm Commando and all other variants.
They are not complicated as such, but not for the foolhardy or those who have to have everything built in a few hours. These do take TIME!
Preparation is the key and the old adage of ‘failing to prepare is preparing to fail’ is very apt when it comes to constructing these lids.
SO, when you get your kit, trim all the parts to the rough guide trim lines that can be seen on the inside of the mouldings using LEXAN Scissors, or a sharp knife.
Leave a couple of ‘mm’ to play with at this stage.
Step 2
Now, start to line up all the parts, and trim so they fit as close as you can get them.
I suggest you do the main bucket first, get this all trimmed up and fitting nicely before sorting the rest of the helmet out.
So what you’re aiming for is to have all your parts so they nicely line up…. Use masking tape to stick it all together and make sure it’s all good. Remember… check, check and check again.
Go Slowly! Take a bit out each time, rather than taking out a massive swathe in one go.
Don’t panic too much if you take a bit too much out though. We’ve got a nice saving tip for you later on.

Step 3
Now comes to sticking it together.
Make up some strips of plastic from all the spare plastic in the kit.
We suggest you make up a wide oval shaped part to sit in the top of the main dome, and then two smaller tabs, one to go in the front of the main brow section and then one to go into the rear of the lower neck part.
Get your strips of plastic and glue them into one side of the bucket. Use clamps or rare earth magnets to keep this firmly in place. Leave aside to dry.
When it’s done, glue the other side to the tabs you’ve just created.
It should look a little like this ——>
Please note, on this one, I have inserted some screws to help the glue. I only did this because the workshop faeries had stolen my clamps! You don’t need to do this.
When it is dry, you’ll have two sections left to fill, one between the dome and the brow and the other down the rear of the helmet.
Take a strip of the plastic and heat it up with the heat gun until it goes floppy (be careful it will be HOT!). Place it into the helmet and mould it to the shape of the gaps (front and rear).
When you’re happy that they conform to the shape of the inside of the helmet, glue it into place making sure it is firmly affixed to both halves of the helmet.

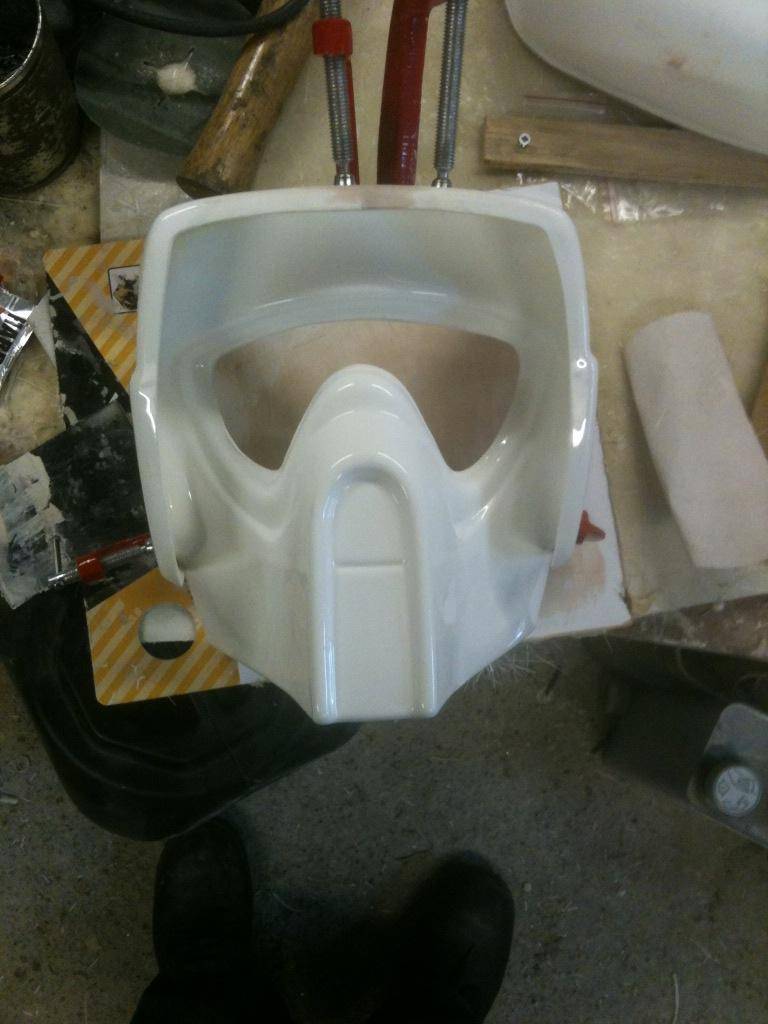
Step 4
Glue the Face Plate into the main shrouds using the same method.
Make sure everything is nicely lined up before committing it to glue.
I suggest a lot of fiddling and moving at this stage with copious amounts of tape to hold everything in place.
Tape the faceplate to the main bucket in the right place, and tape the shrouds to the main bucket also. Tape the two shroud halves together.
Trim, fettle and adjust until it hits that ‘sweet spot’ where everything falls into place nicely.
Mark on the inside of the shrouds, where the faceplate lies on them, this will help when you come to gluing it together.

Step 5
It will end up looking something like this!

Step 6
Now you will have a Scout Bucket that is all together.
You’ll probably be thinking that the world is about to end at this point because you’ll have gaps you can drive a bus through…
BUT FEAR NOT!
You’re now coming on to the filler stage, and that is the little life saving stage that I mentioned earlier.
ANYTHING can be corrected at this stage. Filler… well, it fills any little lash-ups you may have made.

Step 7
Give the helmet a quick key with some 120 grit sandpaper and make sure you do this over the entire dome section (not just the join in the middle) and a good proportion of around the curved sections.
This will make sure your filler has something to bite to.
Mix up your filler as per the manufacturers instructions and apply a thin skim across the joins making sure all the gaps are nicely filled.
On the dome, make sure you go to the edges of the flat dome section.
This is quite important because that makes sure the entire top is flat and you don’t end up with an uneven surface across it.
Flat the filler back with 120 grit paper on a sanding block and make sure you sand across the seam line and not with it. Alter the angles at which you flat and don’t always go in the same direction. This will prevent any ‘dipping or ridging in the surface.
Repeat this process of adding in filler and flatting back until you are happy that the surface is completely smooth and the shape is good.
The better you get this stage, the better your final helmet will look!

Step 8
When it’s all fillered and you’re happy with the surface, you’ll need to primer it.
Go over the entire bucket with some fine sandpaper (400 grit) to take the shine off the entire bucket. This will give the primer something to key to and make sure the paint adheres nicely
Carefully spray the bucket with primer. Light coats are better than one heavy blast.
Remember, if you get a run, don’t panic, you can always flat it out when it’s dry.

Step 9
When the primer is dry it’s on to the top coat.
Basically the same process. Give it a light sand with some 400-600grit paper to give the surface a small key and spray with your top coat paint.
Be aware that top coat is more prone to running than primer so be even more careful.
Remember, any problems at this stage, whilst incredibly annoying, are all solvable. Just flat them out and repaint.
Set it aside now for at least a day for the paint to cure. If you can put it in a heated booth all the better.
Some paints don’t fully cure for up to 6 months… So be careful when handling your freshly painted lid.

Step 10
Do the detailing.
Mask off the snout area and paint the inner part of the snout black.
When this is dry you can glue in the ‘riser and snout’ into the front of the faceplate.
Glue in the visor lens using a hot glue gun.
Apply the decals.

